
Windows has been traditionally offered in various editions and the latest version is no different in this regard. Windows 10 comes in many different flavors but the average user will only care about the Home and Professional editions as all the rest are reserved for specific environments, such as Enterprise and Education. Without delving too much into specific differences, it is fair to say that Pro users have access to more features and wider customization options than Home users. Just as an example, Windows 10 Home users cannot even decline updates or use BitLocker so their devices can be considered less stable and less secure.
Whether the upgrade is worth it or not depends entirely on how you use your computer. If you want to have more control over what happens in Windows then the Pro edition may be exactly what you want. Of course, many of the missing features can be replaced by third-party apps so you can resort to them instead of paying for Windows 10 Pro. Furthermore, having a Pro license does not automatically protect you from Microsoft’s controversial features as you will still have to configure your system manually.
Check your Windows 10 edition
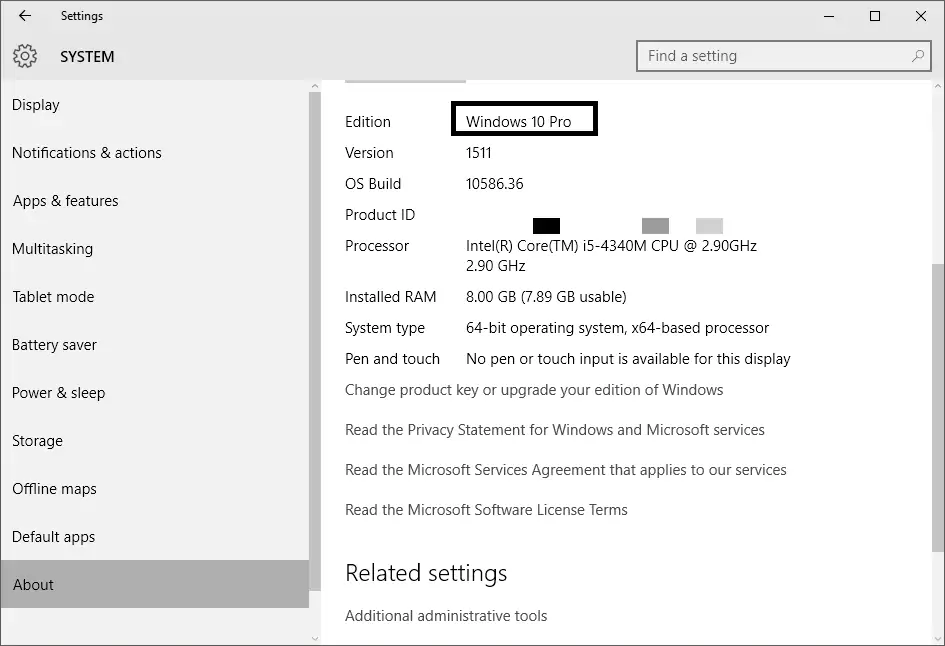
Before proceeding, it may be a good idea to check your current Windows license first, especially if you upgraded from a previous Windows installations. I am assuming that most users with Professional or Ultimate editions of Windows already know what kind of license they have but I also believe that some, such as those who have bought used computers, may be in possession of a Pro license without knowing about it. To check, press WinKey + I to open the Settings and then proceed to System > About. Look at the “Edition” item and you will learn all you need to know.
Buying a Pro license via the Windows Store
Microsoft offers an option to purchase a key directly through Windows, an option that is mostly reserved for those who have bought a Windows 10 Home PC and have decided to upgrade to Pro.
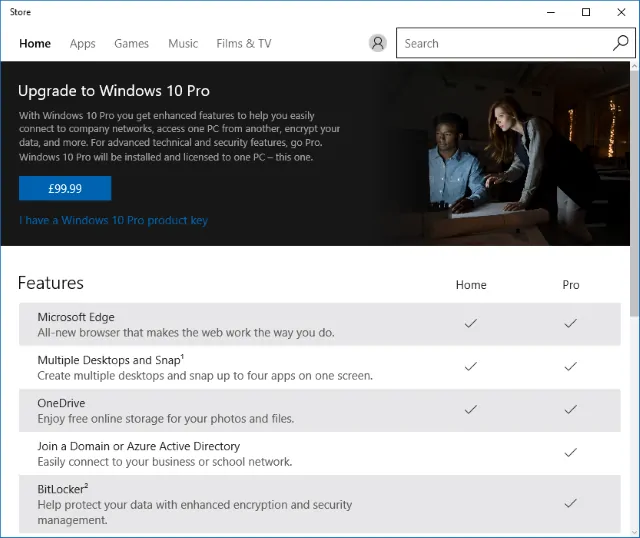
- Open the Settings (WinKey + I) and go to Update & security > Activation.
- You will see a “Go to Store” option so click on that to open the “Upgrade to Windows 10 Pro” window.
- Here you will see a quick overview of the additional features included with the Pro edition but since you are probably aware of them at this point, click on the blue price button to open the “Change Product Key” dialog. You may also have to confirm a UAC prompt at this point.
- Enter your password and sign in to your account. If you have never purchased anything from the Windows Store before, you will need to enter a credit card or a PayPal account to complete the purchase.
- When everything is ready, click on the “Buy” button and the upgrade process will begin.
- Once Windows downloads the required update, your key will be automatically altered. Your PC may be restart a couple of times during this process.
Activating a Pro license you have already purchased
Microsoft and other verified retailers offer standalone Windows 10 Pro licenses though most people are actually upgrading for free from Windows 7 and 8.1.
- Press the WinKey + I combination to open the Settings and go to Update & security > Activation.
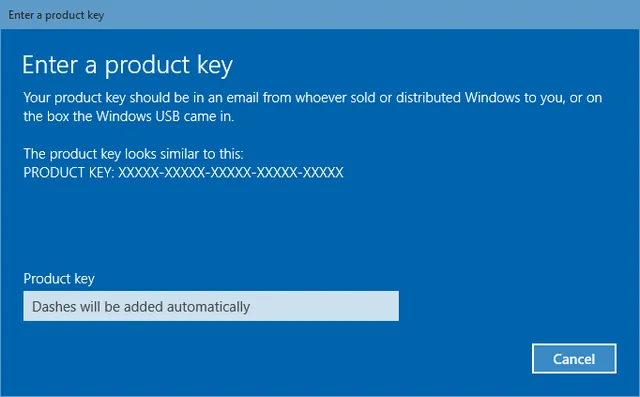
- Click on the “Change product key” button. UAC might ask for your confirmation so click on Yes to continue.
- Enter your product key in the window that opens.
- Click on the “Start upgrade” button. Do as the instructions tell you and close any open apps because your system will be rebooted during the upgrade process.
Activating a Pro license via a bootable USB or DVD
This workaround method is only available for completely fresh installations. When you install Windows 10 on a PC, your product key is instantly associated with your computer’s hardware ID. Microsoft has chosen to do this so that users who wish to reinstall Windows 10 on their computers do not have to re-enter their product keys. This obviously puts limitations in other areas but there is no way to work around it.
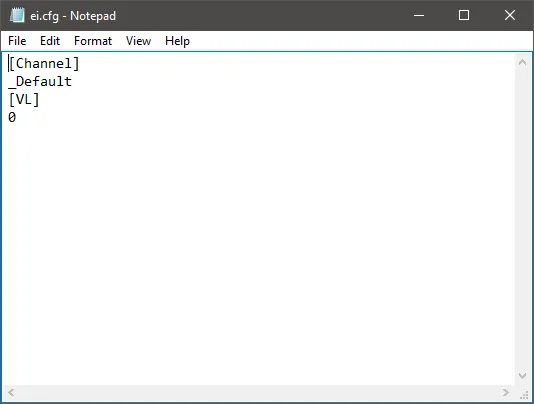
For new computers, adding a small file to the Windows installations files will allow you to choose which edition of Windows you want to install. This option was present in every previous version of Windows but since Microsoft is doing everything over the cloud with Windows 10, it also decided to hide the option this time.
- Create a bootable USB or DVD for Windows 10 using the Media Creation Tool or another similar utility of your choice, like Rufus.
- Visit this link and download the cfg file. I manually created it so you have nothing to worry about but you can also check it out directly via Google Drive if you want. The file contains a few simple lines that will force the Windows setup utility to display options about the edition you are attempting to install.
- The file needs to be placed inside the “Sources” folder of the Windows 10 installation files. Those of you who created a bootable USB just need to insert the device into your computer, open it and then place the ei.cfg file in the appropriate folder. If you went for the DVD option instead, you will need to extract the ISO file and then burn it once more. Utilities like PowerISO and WinISO allow you to edit ISO files directly but you will need to pay for their full versions.


")


