
One of the best aspects of PC gaming is getting to build an awesome machine though time and cash constraints may beg to differ. Regardless of the end product, tweaking and customizing never stops for PC enthusiasts and overclocking is one of the most entertaining and interesting aspects of the entire process.
In the old days, overclocking carried significant risks as most tweaks had to be applied manually. Users had to be quite knowledgeable about every aspect of overclocking which probably made it even more interesting as challenges presented themselves along the way. Now, there are still risks associated with overclocking but the process is not nearly as convoluted as before. If you pay attention to this post, you might be able to start overclocking your graphics card in no time.
Preparation
While overclocking is quite simple nowadays, it does not mean you can safely do whatever you want to your card. Common sense should still be applied whenever you make the decision to overclock your GPU. If it is a new model, there is a pretty good chance it is already optimized for overclocking with safeguards added to protect it. Of course, a lot of people opt to overclock older cards so that they can either breathe new life into them or, at the very least, push them as far as they can possibly go.
So before you decide to overclock your GPU, there are some simple things you should do to ensure that everything will go as smoothly as possible. First, visit this Power Supply Calculator, enter your PC parts and check out the output. Overclocking means that your card will draw more power so your Power Supply Unit (PSU) needs to be adequate enough for the job. This becomes less relevant as time goes on, especially since gaming PCs are usually built with durability and future prowess in mind.
After hopefully confirming that your PSU is good enough, it is time to clean the insides of your PC. Overheating can be an issue even before overclocking and making sure that everything is dust-free is an important part that should not be skipped. And in case that does not help, consider getting an additional cooling system. Once you are done with that too, it is time to proceed to the actual overclocking process.
Overclocking – First steps
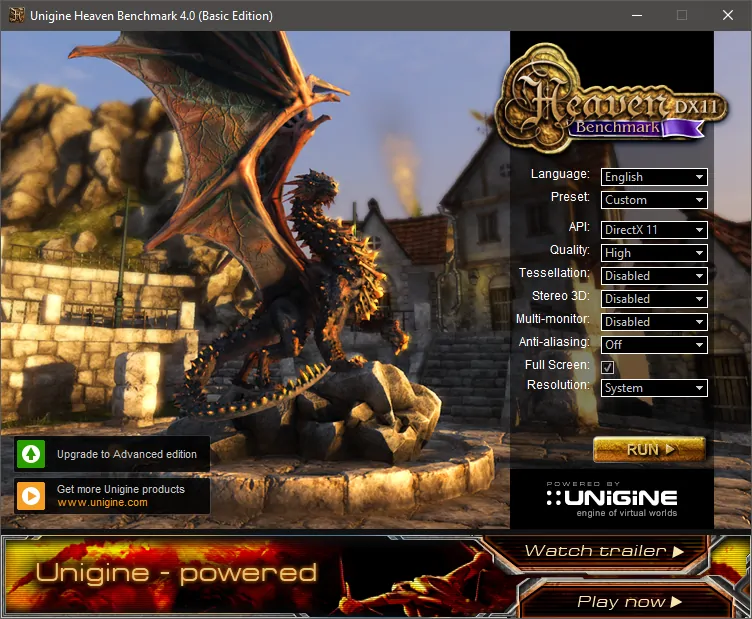
In order to monitor the performance of your card both before and after overclocking, you will need benchmarking software. The most recommended one for our case is Unigine’s Heaven. The software will give you accurate readings and it will also stress your card as much as possible. You will need to run the software as you are tweaking your GPU but you can also run it once beforehand so that you can see the performance differences. In fact, I highly recommend that you note down the minimum, maximum, and average FPS after running the initial benchmark.
You will also need software for the actual overclocking. MSI Afterburner can handle both AMD and NVIDIA cards though that is not the only option you have. You can also grab EVGA PrecisionX for NVIDIA cards and GPU Tweak for ASUS cards. AMD card owners also have the choice of using the Overdrive feature in the Catalyst Control Center in case they do not want to download third-party software. For the purposes of this guide, I will illustrate the process with MSI’s Afterburner. You should always spend some time getting familiar with the overclocking software of your choice, regardless of what it is.
Start tweaking
Now that you have the necessary software, it is time to start the overclocking process. Begin by launching Heaven, either in a windowed mode or in full-screen. This will allow us to check the performance changes as we tweak the GPU. Once Heaven is booted up, launch Afterburner so we can get down to business.
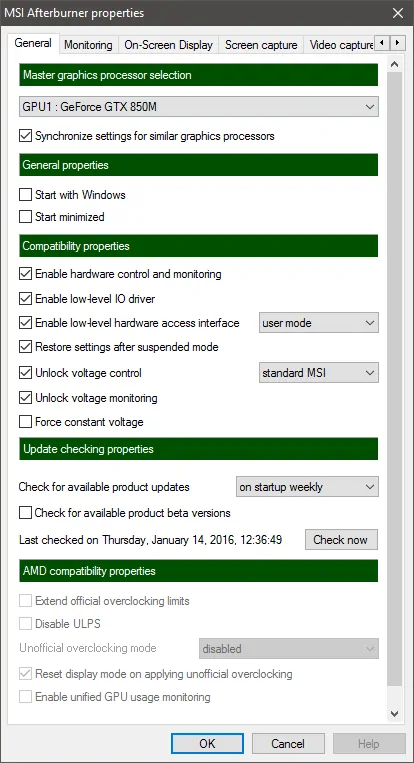
The default settings of Afterburner will not allow us to do everything we want. You need to click on the “Settings” button near the bottom and change a few options. In the General tab, check the “Unlock voltage control” and “Unlock voltage monitoring” boxes. Then, head over to the “On-Screen Display” menu and register a key for the top two options. Pressing those keys will then allow you to enable the display whenever you want as keeping it open all the time might affect your GPU’s performance.
Provided that everything has been set up correctly, you will be able to fuel more power into your GPU so that it does not get throttled. Just move the power limit slider all the way up and forget about it. After you are done with that, start increasing the Core Clock by 5-10MHz at a time. Every time you increase the core clock, head back to Heaven and check how your system is doing. If you notice any strange graphical artifacts or a decrease in performance, roll the speed back by 10MHz until you reach the golden point. Once that happens, leave the Core Clock slider alone.
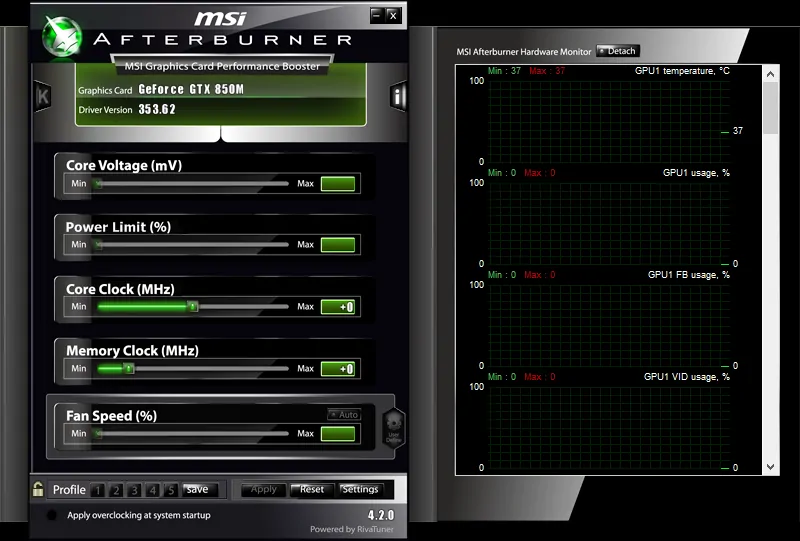
It is now time to increase the memory clock. Increase by 25MHz at a time and go back to Heaven to check the benchmark. The procedure is the same as before so keep on increasing the value until something goes wrong. You should also keep an eye on the temperature of your GPU. The threshold for throttling due to high temperatures stands at around 80C for NVIDIA cards and 90C for AMD cards.
Do note that since you have now increased both the Memory and Core clocks, your GPU will be under a lot more stress. It is quite likely that you will have to decrease the overclocking speeds once again until you hit the actual sweet spot. At this point it is also a good idea to run Heaven in fullscreen mode and really put your GPU to the test.
Testing the changes
Even though your graphics card may perform fine in the Heaven benchmark, it does not mean it will perform equally well when it is under a lot of stress. Basically, you need to run a graphically intensive game for at least thirty minutes or get an application like MSI Kombustor. Kombustor is designed to stress-test GPUs so if your card makes it through, the overclocking process has been a success.

It is vital that you get neither too cocky nor too disappointed when you are attempting to overlock your GPU. There is a good chance the benchmarking software or even your entire system will crash multiple times during overclocking but you just have to find the right settings for your system. It definitely takes patience, time, and just a little bit of luck to get it right but constant tweaks to the settings will allow you to overclock successfully.


")


